Showing posts with label creative corner. Show all posts

Wednesday, July 17, 2013

Minecraft Inspired Birthday Snack Bags

My little man is celebrating his 10th birthday tomorrow.  His birthday happens to fall on a school day.  He's excited to spend his special day with his classmates.  As a simple way of celebrating his 10th birthday, Yohan will give snack bags to his classmates.

Yohan is such a big fan of Minecraft so his dad and I thought of making custom-made Minecraft bags. We bought green fabric bags and printed a pattern of the Minecraft Creeper.  Jules traced the pattern on an illustration board and used a cutter to define the significant parts.  With a bit of black spray paint, we managed to mark each bag with a Creeper's face. 
A snack bag won't be complete without goodies. We're going to fill each bag with chips, biscuits, pretzels, chocolates, and juice. Every bag will have a tag to mark Yohan's 10 birthday.
 post signature

Friday, September 14, 2012

How to Make a Cub Scout Flag

This is Yohan's second year as a Cub Scout.  Last year, he had his Cub Scout Investiture.

Yohan is more active in scouting this year.  Last quarter, he was chosen as Assistant Patrol leader of his group.  He came up with their patrol name Dragon and volunteered to make the group's flag.

Making the cub scout flag became a family activity.  Yohan requested white and red fabric from his grandma while I searched for a simple dragon graphic online.  As soon as I found one, I printed it and Jules painstakingly cut the outline.  He placed the stencil on top of the fabric and used spray paint to fill the spaces in the pattern. We made two flags, a white and a red one.

Yohan and I worked on the outlines of the dragons. Yohan decided that the red one will be the official flag of Team Dragon. To complete the flag, Jules attached it to a long bamboo stick.


Earlier today, Yohan went home to share some good news. He had been promoted to Patrol Leader this quarter.  I'm so proud of my young cub scout.

post signature

Sunday, September 09, 2012

Yohanism #40


After reviewing for three make-up quizzes that Yohan needs to take on Monday (after being absent for two days), he suddenly goes into Pirate lingo mode ...

Yohan: "I'm so tired of reviewing Mom.  I need a break. If I was out at sea and I was a pirate, I would make my crew walk the plank for entertainment."

I laugh at the thought.

Yohan: "I feel like sinking into Davy Jones' locker."

Me: "Huh??? What do you mean?"

Yohan: "Davy Jones' locker is the bottom of the sea. That's how deeply tired I am."

I was dumbfounded. ha!ha!

I made this pirate hat for Yohan several months ago using black cartolina for the hat and bond paper for the skull.

 post signature

Monday, September 03, 2012

Paper Airplanes


When I was young, I used to make paper boats and paper planes.  I enjoyed folding pieces of paper until they transformed into familiar shapes. I'm glad Yohan recently discovered the simple pleasure of creating paper planes. His Dad taught him how. When Yohan mastered the folding techniques, he made two planes and presented them to me. He said the black one belongs to him and red one is for me. My red plane has a heart and the letter "M" that stands for Mom.

post signature

Thursday, March 08, 2012

How to Make an Easy Diaper Cake

A diaper cake is a lovely and creative gift for expectant mothers. It's perfect for baby showers. A diaper cake looks like a traditional layered cake but instead of cake and icing, it makes use of baby diapers and other baby essentials.

I took some photos of my first experience in making a diaper cake.  Let me share the following easy steps in making one.

Ingrdients for the diaper cake:
  • 47-50 newborn baby diapers (This will depend on the number of rings and layers that you will make. I used less than 50 diapers.)
  • regular rubber bands
  • large rubber bands
  • 1 or 1/2 inch wide decorative ribbon
  • cardboard or plastic cake holder (You can buy this from baking stores or you can make your own using an illustration board.)
  • 1 8-oz baby bottle
  • 1 4-oz baby bottle
  • long wooden stick
  • assorted baby things for cake decoration

Step 1 - Roll the diapers tightly (see example below) and secure each one with a regular rubber band. Make sure the decorative part of the diaper can be seen.


Step 2 - To make the 3rd (lower) tier, get the cake board or holder and place the 8-oz bottle in the center. Then place around 7-8 rolled diapers around the baby bottle and put a large rubber band around the the circle of diapers.  This will serve as the inner ring.

*Don't worry about following the exact number of rolled diapers because it may vary depending on the thickness of the diapers.

Step 3 - Next form the outer ring by surrounding the inner ring with 14-15 rolled diapers. Secure the entire circle of diapers by putting a large rubber band around it. 


* If you have a bigger cake board, you can make 3 rings to surround the baby bottle but you will need more diapers.

Step 4 - To make the 2nd tier, make another inner ring. Surround the topmost part of the baby bottle with 
 around 5-6 diapers then put a large rubber band around it. Make an outer ring using 10-11 diapers and secure it with a large rubber band.  

*The diapers used in the 2nd tier were rolled tighter compared to the lower tier.


Step 5 - To make the 1st tier, position the 4-oz bottle on the center of the 2nd tier. Surround the baby bottle with around 6-7 rolled diapers and put a large rubber band around it.

Step 6 - To attach all 3 tiers, insert a wooden stick in the middle. Make sure the stick is long enough to reach the lower tier.


Step 7 - Decorate your cake. You may add baby things like baby spoon and fork, pacifier, bottle cleaner, socks, rolled onesies, rattle and others.

Add a topper of your choice. For my diaper cake, I chose a small Ernie plush toy. Make sure that you secure the topper on the baby bottle cover peeking through the 1st tier using a rubber band, string or ribbon.

Cover the rubber bands with decorative ribbon. You may cover the whole diaper cake with a big cellophane or netting before giving it to the expectant mother.

This is the finish product. 


post signature

Saturday, August 07, 2010

Photo Hunt :: Colorful

PSHunt
Come and join

My son had a fun 7th birthday celebration in school a few weeks ago. My husband and I brought some food for the kids and gave each one a personalized birthday token. In lieu of the usual loot bags filled with candies and chocolates, we gave them these colorful miniature pots with wooden animal clips. We had the kids' names printed to give the giveaways a nice touch.


post signature

Tuesday, August 03, 2010

How To Make a Cupcake Tower

For our son's recent birthday celebration, hubby made a simple 3-tier cupcake tower from scratch. It was fun and relatively easy to do. Even the birthday boy helped out.

Interested to make your DIY cupcake tower? Here are the materials and simple steps.

You will need: 
2 large Styrofoam boards
2 even sized Styrofoam squares
ruler or measuring tape
marker
decorative paper (or fabric)
scissors
cutter
tape
glue
long and thin wooden stick (BBQ stick can be used)


Procedure:

1. Cut 3 Styrofoam squares measuring: *8x8, 10x10 and 12x12. Use a ruler or measuring tape to get precise measurements. Use a marker when making measurements so you can easily cut the proportions using a cutter.

2. Cover the Styrofoam boards and squares with decorative paper or fabric. For paper, you can use craft glue. For fabric, it is better to use glue gun.

3. Connect the pieces using wooden sticks. You also have the option to glue them permanently.

4. Clean the surface of the tiers. You can gently wipe the decorative paper or fabric with paper towel. Arrange the cupcakes starting from the last level going up.

Enjoy!

* You can also use round Styrofoam boards or ready made cake boards measuring: 1×8″, 1×10″, 1×12″. Replace Styrofoam squares with cylinders.

post signature

Saturday, July 03, 2010

Photo Hunt :: Open

PSHunt
Come and join


When my son opened page A54 of his Harcourt Science book, he saw this Model of an Insect project.  I helped him create an ant model.  We didn't have all the original materials so we substituted some of the things. Good thing I still had some googly eyes left in my craft box. Yohan was happy about the final outcome -- a fiery red ant.


post signature

Thursday, July 01, 2010

Kimono Doll Pens


I love my Kimono Doll pens. I got them for only P19.75 each at Clipper. I was smitten by their cute little faces and chinky eyes. Now they even inspired me to make a haiku ...

Wind touches her hair
As refreshing as sunlight
Love that breezy smile


post signature

Sunday, June 20, 2010

Happy Father's Day!

Happy Father's Day to my Dad, hubby and all the wonderful dads around the world! I would like to share this Father's Day card that Yohan made for his Dad. As you can see, he was inspired by the FIFA World Cup.  Hubby is a big fan of FIFA. He stays up until the wee hours of the morning watching the games on TV.


post signature

Monday, May 03, 2010

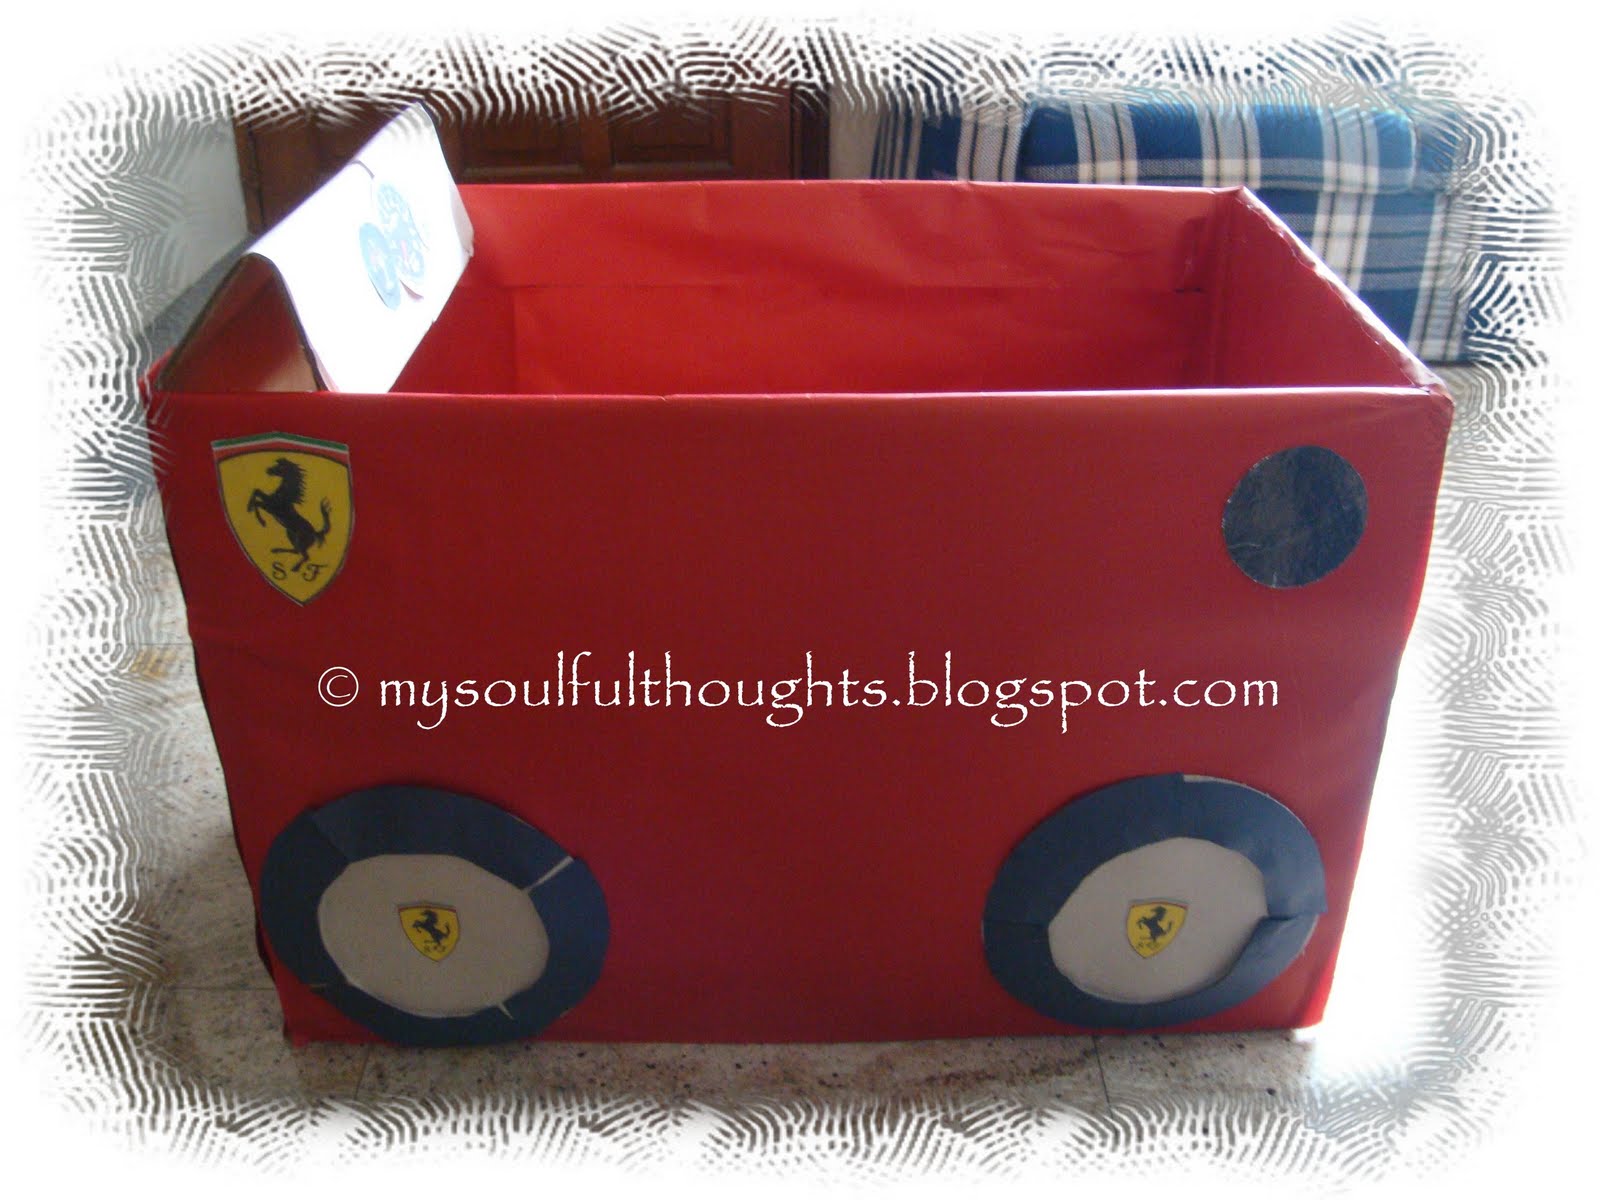
How To Make a Race Car Using a Box

Transform a big cardboard box into something fun and useful.  You can make a race car using a big box. It's a great project for the family. 

Materials:
  • Big cardboard box
  • 6-7 paper plates
  • 4-6 red cartolina (poster board)
  • colored paper or construction paper
  • glue gun (ordinary glue if you don't have a glue gun)
  • scissors
Procedure:
  1. Fold the two long flaps of the box inside. Do the same with one of the short flaps. Glue them permanently using a glue gun.  Another option is to cut the three said flaps.
  2. Fold the remaining short flap at the middle and form into an inverted V.  Glue the lower sides of the flap to the box.
  3. Cover the outer box with red cartolina (or any preferred color).  You can use the rest of the cartolina to cover the inner box. 
  4. Enjoy designing your own wheels using paper plates. Use colored/construction paper and cut-outs to make desired details. Simply attach the four wheels on the box using a glue gun.
  5. Make a steering wheel using paper plate if desired. You can glue the steering wheel or secure it with a button fastener just below the dashboard.
  6. Use two paper plates for the headlights.  Adjust the size by cutting it into smaller circles.  Use red colored/construction paper for the outer border and yellow for the inner circle. 
  7. Cut red and yellow circles and glue them at the back of the box to serve as tail lights.
  8. If you have a printer at home, you can search and print pictures of a speedometer, fuel gauge, tachometer (rpm gauge), etc. Glue them on the dashboard.
  9. Have fun adding more details to your car.  
My son requested for a Ferrari.  It was fun watching my husband and son create a cardboard Ferrari. All I did was print the Ferrari emblems. When it was done, Yohan grabbed his small chair and placed it inside. He hopped in and he let his imagination take him to his destination. Vroom ... vroom!!!


You can also use this cardboard race car as a toy chest.  I'm sure you can use this project to encourage your child to be responsible by putting away his toys after he play time.


post signature

Thursday, November 05, 2009

Birthday Haiku For Jules

Today is special,
Blowing wishes in the air,
Grasp, hold tight for keeps.

~~~~~~~~~~~~~~~~~~~~~~~~~~~

Happy Birthday Jules! I love you.

post signature

Monday, November 02, 2009

A Pirate For The Second Time Around

My family and I went to the mall to buy Halloween treats and a ninja costume for Yohan. Superhero and scary costumes were abundant but sadly they run out of ninja costumes. I couldn't believe it! I offered to buy him another costume instead but he didn't like any of the available ones. He told me he would rather wear one of his old costumes.

Yohan was unusually quiet. I thought he was upset about the costume but I found out later that he wasn't feeling well. We were at the grocery buying treats when he showed signs of nauseousness so we decided to go home early.

Hubby and I decided to let Yohan skip the annual village Halloween activity at the clubhouse so he could rest. Surprisingly, he felt re-energized after a short rest at home.

Treats for Trick or Treat


At last year's Trick or Treat, he was Thomas the Tank Engine. This year he donned his black shirt with a skull, striped pants and hook ... a pirate for the second time around.

Captain Yohan


Yohan was able to make a few rounds in the village but the rain came at an unwelcome time. We had to cut Trick or Treat short because of the weather. Thankfully Captain Yohan wasn't too disappointed. He still managed to have fun. The other kids were discouraged to continue due to persistent rain. I have lots of Halloween treats left. Care for some? :)

(edited: 11/06/2009)
In the spirit of Halloween, I helped Yohan make Halloween cards for his teachers and pumpkin cut-outs for his classmates.

Yohan thought of the concept. I just helped him make cut-out figures.


DIY Halloween cards

post signature

Monday, August 17, 2009

Haiku #2

Shutters gently close
Soft melody, orange skies
Travel in silence

post signature

Sunday, August 09, 2009

Haiku #1

Skin hot to the touch
Raindrops, sunshine, so fickle
Oh my worried heart

post signature

Monday, July 13, 2009

Weekend Snapshot #81

To join this weekly meme, click here.

My son loves building stuff using his City Series blocks (similar to Lego). The small structures usually come with instructions. I was desperately helping my son with his windmill when hubby came home to the rescue. I was relieved when hubby was nice enough to fill my shoes for this task. :) Yohan was so pleased when it was finished. Yohan made the wheel barrow and truck all by himself.


post signature

Sunday, June 21, 2009

Happy Father's Day

Thank you to my Dad and husband for the love, support, understanding, kindness, respect, inspiration and strength. I want to wish my Dad, my husband and all the great fathers out there a wonderful Father's Day. I would like to share my son's Father's Day card.


post signature

Saturday, May 16, 2009

Photo Hunt :: Painted

PSHunt
Come and join the hunt here

Face and body painting are popular during kiddie parties. Kids love it as well as adults. :) Below are photos taken at Yvaine's (hubby's niece) 1st birthday party a few weeks ago. We were early at the party so my son was the first in line. Yohan had his hand painted with a cool Lightning McQueen image.


Guess who was the next in line? Yohan's groovy grandma (my MIL). She had a cute pink butterfly to match her pink blouse. :)


Next was my MIL's twin sister. she had a green butterfly painted to match her shirt.


post signature

ss_blog_claim=b51e87937c706bf37c4aa8ee59fa3a40