Nursery 1 Students are asked to wear plain black outfit with "Broadway" accent for the 1st and 2nd dance. Ex. Top hat, necktie, bow tie, scarf, tuxedo,vest and suspender.
The students will wear the same black attire with "Red Heart" accent for the3rd and 4th dance. Ex. heart headdress, headband with hearts, belt with hearts, pins, necklace and the like.
My husband and I bought him a long sleeves black polo. We let him use his black slacks (which he used at a cousin's wedding) and school shoes. I'm so thankful for Yohan's grandmother, Mama Norma for making him an aqua green bow tie and wide belt. She meticulously sewed sequins, beads and costume jewelry to make it fabulous.
Here's Yohan trying out his costume for the 1st dance. It needed something else to complete the Broadway look ... a top hat. We couldn't find one at the mall so his Dad made him a top hat from scratch. Check out procedure below.

How to make a Top Hat:
Materials:
- Black Poster Boards
- Black Felt Paper
- Pencil
- Glue Gun
- Stapler
- Scissors
- Cutter
- Find a large plate to make a circular pattern on the Poster Board using a pencil then cut it with a scissors.
- Find something that you can use to measure your child's head with ~ an old hat, cap, a bowl, etc. (My hubby found an old turtle toy. He tried the turtle shell on Yohan's head and it was a perfect fit so he used it as a pattern.)

- Use a pencil to draw another circle inside the earlier circular pattern you made. Cut the inner circle with a cutter (like a donut). Set aside.
- Using another Poster Board, form a cylinder. The mouth of the cylinder should be as big as the inner circle in #3. Glue the sides of the cylinder together. Height of the cylinder depends on how tall you like the top hat to be.
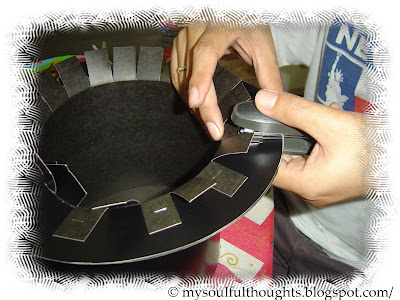
- Cut short vertical lines (around 1-2 inches long) around one end of the cylinder to form some flaps.
- Slip the "donut" through the cylinder.

- Staple or glue the flaps on the "donut".
- To close the top, use the open part of the hat as a pattern. Using a pencil trace it on remaining Poster Board leaving at least 1-2 inches allowance. Cut it with scissors.
- Cut short vertical lines (1-2 inches long) around it to form flaps.

- Use this to cover the open top of the hat. Glue the flaps to the hat using a glue gun.

- You can make the hat look more elegant by covering the hat it with felt paper. Use a glue gun for a clean finish. Covering it with felt paper hides the staple wires and flaps.


I'm happy to share with everyone this photo of Yohan in his costume for the 1st dance.

More photos of Yohan's costume for the second dance and actual school presentation to follow.

Thank you so much. Glad to have found you. Costume and hat looks awesome!
ReplyDeleteVery nice job. My grandson (age 16 months) is ring bearer at my daughters wedding and we hope to do as good a job as you did to go with his tuxedo! Thank you for sharing this.
ReplyDeleteKris
Great tutorial! My 8yo has memorized the Gettysburg Address & I was looking for a how-to on a stovepipe hat for his presentation. This will be perfect!!
ReplyDeleteHI,
ReplyDeleteThat was a great step by step tutorial. I will try to make one for my son's Willi wonka costume for the Hallooween party this year. Happy Halloween.
This came handy for my 3rd grade daughter hat parade, thanks for the tips :)
ReplyDeleteThank you! I'm making a top hat for my little Abe Lincoln tonight using your instructions!
ReplyDeleteI followed your instructions to make a hat for my daughters Halloween magician costume. Thank you!
ReplyDelete